While building our garden beds, I used the GrowVeg website to plan my garden, which also tells you when to start sprouting for your zone. For us here in Zone 4b, 8 weeks prior to frost date meant planting seeds in March!
Filled each pot with seed starting mix
Germinating seeds under saran wrap, covered and with warming mat
I wanted to plant things that I either couldn’t find in the store (heirloom), we use a little bit here and there but it’s expensive in the store, or just try out a few things and see if I have a green thumb. While in a grocery store back in January I saw a catalog called Baker Creek Seeds that had a great selection of what we were searching for. After placing an order, I got a bunch of seed packets and got to work.
Researching how to sprout seeds, though there were tons of options, I went with Black Gold seedling mix and bought a bunch of warming mats (worked great) and various grow lights through Amazon. I planted everything in early March and on March 12, here’s how the sprouts and setup looked: Awkward YouTube Video.
Though my seeds sprouted, eventually a bunch died. Also, they grew very poorly. Some fell victim to the dreaded “damping off” and I have my suspicions of why, but the newspaper pots is the big one. Also I used wood popsicle sticks, I’ve heard that can spread the disease. Ultimately, here is why the newspaper doesn’t work:
Difficult to properly water: get soggy and have questionable absorption, dry out too quickly and may wick away water too quickly?
Supposed to degrade.. Nope. After 3 months of using them, and having both in garden beds and in the ground, zero degradation. Roots poking through? In that time, only a couple onion plants had roots poking out of the paper. Calendula below grew well, but root bound.
Inhibit growth: Sprouted? Check. Actually grow? Meh. See comparison of my Little Gem lettuce below- The tiiiiny one in the paper pot had a 2 month head start on the ones directly in soil, planted just 2 weeks prior!!!!
I thought garden beds would be simple and take just a weekend…. boy was I wrong! Five months later we completed the project… To be fair, we started in cold November and let holidays, work, snow days, pregnancy issues, etc. get in the way. But we kept working on it here and there and finally finished yesterday. I am so in love with the final look and can’t wait to get gardening!
Pinspiration: Two Peas and their Pod
Inspired by pinterest, I designed a similar concept while at the counter of my local Menard’s. Based on the post, she made it sound easy- and it looked simple enough.
Looks easy, right? Although cedar is widely used for outdoor garden projects, it’s very pricey and the wood isn’t touching any soil for our design. Sounds like the concern with treated wood is the chemicals used can leech into your soil and food. In any case, we used cedar tone pressure treated pine in 2″x6″x8″ and bought corrugated steel siding which we cut into 8″ and 4″ sections to make the three beds 8 ft x 4 feet-ish and 2 feet high. A few learning points came up :
The steel siding is the same length as the wood after the initial cut to the panel, so the steel had to be trimmed down further from 8 feet and 4 feet to fit inside each face. This required a few extra trips to the store for the right circular blade and multiple charges to our hand saw battery.
I thought the cap on top might need a wider seat so got some 2″x 8″x 8″ wood, which we returned to the store. The 2″x6″x 10″ works fine.
Initially we tried metal plates to join the faces which failed miserably. My husband found this amazing jig that is soooo sturdy and when we had an issue with a bit, the company’s customer service went above and beyond, we were so impressed!
With a planned subirrigation system, these had to be level, and our yard slopes in the back. Leveling dirt.is.not.easy.
The project launched just before Thanksgiving in our garage. After cutting the wood to size we had to drill each pocket to seat the joining screws at the proper angle.
Wood to be cut plus using catchbin for drill shavings
Definitely a job to take a seat and rest, although the Kreg HD is super easy to use. Recommend keeping a few charged batteries ready to go, or use a corded drill.
Kreg HD jig creates perfectly angled screw pockets to join wood
Once the pocket is drilled out, it’s a quick process to join your wood.
Long drill bit to seat the screws
Joined wood face
The short and long faces of the boxes were assembled outside with galvanized screws. With this assembly, the short 4 foot long side gets 1.5 inches added to either side with the addition of the long 8 foot face.
Next we realized that the slope would be an issue, as each box would tilt backwards and the bottom water reservoir would be uneven. If you’re just piling dirt in your garden beds, the next step can be skipped.
Gentle slope to the south and west
Back to the hardware store we go! We cut the heavy sod out using an edger (We tried using a flat shovel… with a resulting calf muscle tear in the process. The right equipment for the right job is key.) Leveling the dirt was easiest with a tamper. Though we considered QuikRete to lay down a solid base and keep tunneling critters from coming up underneath, we found some concrete bricks on sale that made the job less messy. Then, brush a few bags of sand between the blocks to deter burrowing animals and keep the blocks in place and the foundation was set.
My husband made the cap on top for a nice seat using a 45 degree joining angle with deck boards that came with a rounded edge, 2″x6″x10″ and used the Kreg HD to join the corners plus affix it to the top of the frame. Finally we made sure all the steel was cut to fit inside each wood face, hammered nails to create holes for the screws and stood back to admire our work!
Use ear protection while cutting steel
Measure twice, cut once
Affixing the steel
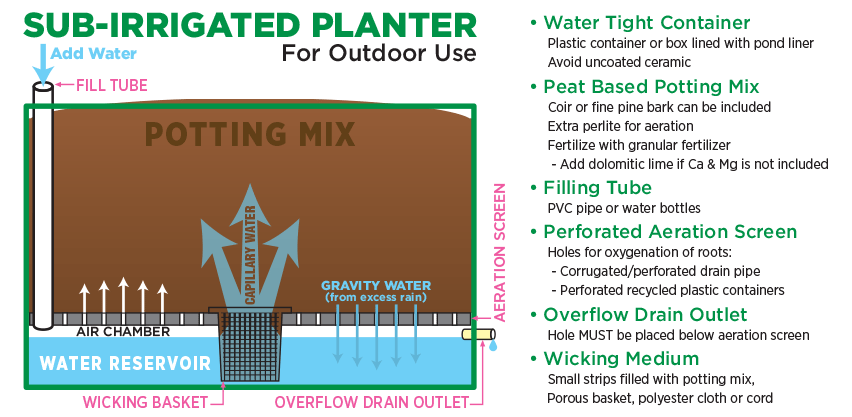
Next step: Install the subirrigation system, which uses a pond liner, perforated tubing to hold a water reservoir, and a special potting mix to wick water up to the roots. What’s all that nonsense you ask? Check out this video and blog, the author has been great about answering my emails and questions so I’ll post about that soon.
I’ve already started the seeds and getting sproutlings to put into these amazing beds, here’s a preview for a future post!
Germinating seeds under saran wrap, covered and with warming mat
This month I have every Saturday off so get the chance to sleep in and wake up to have brunch with my husband and daughter. Today we tried a new recipe I found in Martha Stewart Living’s March issue, Chilaquiles Egg Bake and added some personal touches.
After moving from southern California, we missed the authentic Mexican food and fresh ingredients we could discover all over town. Since then, I’ve slowly accumulated some homemade recipes to feel like we’re back dining by the sunshiny sand and beaches!
Today I spiced up this recipe using carnitas and a tomatillo sauce I came up with myself, plus added the avocado. My husband thinks the carnitas is a definite Must for this recipe, it adds something the original would probably be missing, an acidity or complexity of flavor. If you’re not interested in making carnitas, I would think some chorizo would be a good substitute! Kudos to my good friend Katie for the carnitas who gave me the recipe (I believe the link is the one I use, though it was attributed to Nom Nom Paleo?) This tomatillo sauce was inspired by a visit to The Flying Iguana in Jacksonville, Florida and we use it on Everything! Enjoy 🙂
With settling down and buying a house, I now feel the need to put down roots- literally. After being active duty Navy for 8 years it’s a good feeing to know I’ll be around this patch of dirt for years to come! Most (ahem, all) my gardening experience has been with pots of succulents started in San Diego and lovingly moved to Florida and now Nebraska. I won’t count the random potted herb that only lives until I decide to make bruschetta or salsa…
Kitchen sink succulentsOverwintering succulents
Can I contain my excitement after many years I’ve looked forward to this? NO! That’s the main reason I started up this blog again! Hopefully it helps you out as much as me to track the progress and decisions I’m making, and I’m sure the many missteps to come. It’s all about learning, right? And if it’s delicious and smells nice and gets me and my family outside eating homegrown organic food and learning about butterflies, even better.
A friend once said I “go nuclear” when learning something new. Guilty as charged. Here’s my butterfly & veggie garden plan (36 ft x 36 ft border):
Butterfly Garden 2017Vegetable Garden 2017
Perhaps a bit large? Too much? Ha! Not if you ask me so I will forge ahead! Where to start blogging about it though- well I’m a planner. As you can see. I’ve used multiple online sites to help me come up with the above plans.
Vegetable Garden: This will be in a raised garden bed (more on that later). I’m planting more heirloom varieties, things I can’t find at our local grocery store plus herbs we use frequently in our cooking. The planner I’m using is GrowVeg and I bought seeds from the Baker Creek Seed Catalog.
On the sides of each bed I have companion beneficial flowers to assist in pollination and harboring good insects. About 50-75% of these I’ve already started in newspaper seedling pots and will post about my germination station soon!
Arugula, Basil, Borage, Calendula, Carrot, Celery, Chamomile, Poblano pepper, Serrano Pepper, Zavory Habanero pepper, Chives, Cilantro, Persian and english hothouse cucumber, Dill, Edamame, Fennel, Ginger, Little Gem Lettuce, Butter King lettuce, Dandelion, Walla Walla onion, white onion, Red Burgundy onion, Chervil, Hamburg rooted parsley, Anaheim pepper, Shishito pepper, Potatoes (fingerling maybe), Kabocha pumpkin, summer squash, rosemary, sorrel, tansy, thyme, Tomatillo, Tomatoes: Black, Orange, Green, Yellow, Purple, Zinnia.
We’ve also started breaking ground on the backyard, here’s a preview for a future blog!
Hello 2017, skipped about 6 years in this blog and decided to revive it. Why? A lot can happen in 5 years!
I met my husband, deployed to Afghanistan, got married, had a little girl, moved a lot, and am pregnant with a second girl. I sold my motorcycle, got out of the Navy and had to stop running (wah!- pregnant hips, hope that gets better) but got into lifting and Russian Kettlebells. Since getting out of the military we decided to settle in Nebraska and we are now homeowners. Phew! Lots of change!
Career wise, I was a doctor in the Navy and continue to practice Emergency Medicine which is so much fun and challenges me every day. I picked up new hobbies… quite a number if I really think about it.
To sum up, a long time ago in a sunny place far far away I was a single ER resident who blogged about running – fast forward a few years to a wiser ER mom with half finished projects all over my new midwestern house. I’m back to tell you all about it!
As I was on my trauma rotation and had to work most weekends, and also given that half marathons are scant in July, I wasn’t able to do an official 13.1. So instead I strapped on my Garmin and ran for 13.1 miles! It wasn’t so bad, and I wasn’t pushing it too hard given that my training has fallen off recently. I think in the end it took about 2:20 and my route was just from my house and all around Pacific and Mission beach and into Mission Bay. It won’t be an addition to my finisher’s medal collection but I don’t mind. No finisher’s pics either, but no love lost there! I’ve got the America’s Finest Half Marathon coming up next weekend. I had hoped to break 2 hours for this next one but I’m not sure if I will as I haven’t been training appropriately. Should be fun 🙂
My friend Andrew says today was my first real bike ride. If that entails powering through hill after hill after hill and crouching on the downhills so much I feel like I did 200 push ups, he might be right. We did the Great Western Loop today and it totally changed my view of cycling!!!
I bought a Trek 2.3 WSD 2009 off craiglist in preparation for the Mission Bay Sprint Triathlon. A coworker suggested it but only after talking about it with my Ironman friend Albert did I actually sign up. Though I’m trying to focus on half marathons this year, I was encouraged to do it because
It’s pretty much right outside my apartment and easy to access
It’s a sprint, so not too long of a distance and doable for a novice like me
After getting my bike at a steal price that came with clip-ins and shoes, I first tried it out at Fiesta Island. Being attached to your bike-literally- is pretty scary and I wanted to try it out where traffic was minimal. Wearing my Garmin, I rode around until I got hungry and decided to see how far I went- 20 miles! Sweet! I then fell to the ground and got a scabbed knee because I didn’t clip-out… amateur move I know!!!
The second time I went out was with my cyclist friend Andrew who loves hills and loves riding at the hottest part of the day. So we climbed up Mt. Soledad, but the ascent wasn’t nearly as bad as I thought and was only about a 13 mile ride.
Today I decided to do a more scenic ride and my staff on trauma, Dr. Shackford, is an avid athlete (seriously, the guy is amazing) and he recommended a few trails.. one being the Great Western Loop. I figured “How bad could 40 miles be?” Um, Leslie, you might need to rethink that logic next time….
It was TOUGH. Climbing and climbing and climbing… at one point my legs were shaking and I wondered if I could even stay upright. And that was only 1/3 of the way into it. Thankfully I brought AccelGels and a waterbottle and my friend Andrew stopped to wait for me a few times, allowing some rest. He’s done a century before, on this same road, yet it was tough even for him!
He was joking about heading back the easy way instead of the full 40 like we planned. To that I just said “I don’t think about that. I just think about finishing.” When I say I’m doing something, I DO IT! Yes it was hard and yes I might not be able to move tomorrow… or the next day…. but damnit I DID it and it was fantastic!! I think I can say I’m a cyclist- so long as 5 years from now I can still tackle that crazy elevation 🙂
East of San Diego- 40 miles is a lot more than I thought!!
Ran this one after a night shift! Forgot to ask off of work, so had a friend come in an hour early… I changed in the locker room and ran 1.6 miles to the start line in Balboa Park. Waited a half hour for a bathroom… and just as I’m about to get my chance, they play the National Anthem. Being active duty, I feel I should probably stand at attention. The lady behind me starts poking me (I’m trying to maintain military bearing and pay no attention…) until the lady behind her points at all the other people standing at attention, explaining my sudden statue-like state. It was over with quickly enough, after which I had to run up to my corral and figure out my new Garmin!
At the Expo the day prior I stopped at the Garmin counter, asking questions about which one I should get. I’ve been thinking about one for a while, and having just come off a night shift also, was tired and susceptible… and made an impulse purchase. No regrets though! My new Garmin is AWESOME! And my first use was on this race. Boy was I surprised by what it said…
Well I’ll talk about the course itself first. I did the full marathon two years ago, and the planning and execution of the whole event was again very good. Unlike before, the finish was at SeaWorld instead of the Marine Corps Recruit Depot. However, I still haven’t truly been to SeaWorld, just its parking lot 🙂 The half course went through Hillcrest and Balboa Park, but that’s about where the scenicness ended. It was then a slow uphill without rock bands playing until the end of a long stretch of highway, but we were rewarded by a large spectator crowd at Fashion Valley Mall.
We then continued onto a side street of the I-5 and the route got better again at mile 12 when we turned towards SeaWorld and I actually saw a friend working the medic tent! I ran out to see her, and she said “oh my gosh, what do you need?” thinking I was injured. At first I didn’t understand, so all I said was “a hug!” I had packed 4 AccelGels into my SPIbelt and stopped at nearly every water station, a strategy which worked fairly well.
My pace was pretty good until mile 9, when I started to feel the effects of the previous week’s half marathon. On reading the results of my Garmin, it definitely correlated with what I thought! HOWEVER what did NOT correlate was that I found out I was at my Max Heart Ratethe whole time!! I knew I was pushing myself- Hey, I wanted to do better than last week- but Seriously??? Wow, I really gotta work on my cardiovascular fitness! Not like it’s terrible, my resting heart rate is 63 but it seems I have room to improve. My time was slightly better, 2:01:36, a 9:14 pace…
Though this race was really nice- my personal trainer met me at the end and we had MGD at the beer garden- it was a bit cloudy and I was tired. I had to go back to sleep ASAP to work a hift that night again… squeezing a half marathon between two night shifts was tough but definitely worth it 🙂
As my last 2 half marathons were so close together (one on Monday, followed by the next on Sunday) hopefully I can convey just how distinct they were! Laguna Hills Half 2011
Squeezing my New Year’s Resolution to run a half marathon once a month into the last bit of May turned out to be a really good idea… the Laguna Hills half was great! Initially I wasn’t sure if I wanted to do it, so I didn’t sign up ahead of time. On the Sunday before, I figured “sure, why not?” So I made sure to get a good night’s rest and set my alarm for zero dark-thirty (as we say in the military.)
Driving the hour up to Laguna Hills gave me time to hydrate and eat a small granola bar ahead of time. I hadn’t realized I was running late, so when I parked at the Laguna Hills Shopping Center I had a mere 20 minutes to register!! Racing to the registration table, filling out bubble sheets, getting a blank bib, and pinning on #1776 as I’m finding the proper corral took almost exactly 20 minutes 🙂
It was a smaller race but the course went through some scenic parts of the local residential area, then into a few local parks. The views were constantly changing, the elevation was variable but not too strenuous, and the vibe of the whole thing was really upbeat! I would most definitely do it again and recommend it to anyone. There were a few challenging hills for beginners but complex enough for someone with a bit more experience.
My time was 2:04:48, which gives me an average pace of 9:32. Better than my last, and the next was better still!! Me and my medal!
As part of my emergency residency training, I am currently on a month of learning about paramedics, fire rescue, and the policies and endless meetings may someday help me to be in charge of Emergency Medical Services. I’ve done “sit-alongs” with 911 dispatch and also with the radio rooms at the base hospital. It’s a very complicated system that I’d been so ignorant of before!
Let me just say that I was impressed with how all the systems come together and are so efficient in providing emergency care to the streets. Much as we ER docs think we’re on the “front lines” of medicine… those first responders really have that title!
The best part, by FAR, has been my medic ride-along and my engine ride-along. The first 12 hour shift was on an ambulance, where my job was really to sit back and observe, help when I could. Call after call we met the engine already on scene, went into peoples homes, and took care of the patient with whatever was available in what we could carry. After that we’d transport to whichever ER was closest, or whichever they typically go to. I got a tour of San Diego’s ER’s, which was very cool!
The second 12 hour shift I had was with the fireman, which wasn’t nearly as busy. They respond to “medic aid” calls also, not only fires. It was nice that random people on the streets wave Hello at the engine, once even yelling out “hey, you got a girl fireman in there!!” 🙂 The most exciting call on that day was a highway pile-up but thankfully no one was seriously injured. I did get to help out with using my spanish, something I wish I could get more practice with!
That afternoon there was a vegetation fire that we were called on. As soon as the alert went off in the station, we loaded up in the HUGE engine (that cab can fit my bedroom in it!), lit up the lights and sirens, and went out to investigate. Turns out it was just a small brushfire- it was mostly burned out by the time we got there. However, we still unloaded the hoses to take care of anything still active. After the two firemen finished spraying, they took out some shovels to look deeper in the soil. At this point, one of them said “Hey, how about we get the Doc on the nozzle?” and handed me the hose. AWESOME!!!!!!!!!!! I took care of the smoking patches around the perimeter… so no I can actually wear my “Junior Firefighter” sticker!!! 🙂


 Calendula: grew well, but root bound!


 Arugula, Basil, Borage, Calendula, Carrot, Celery, Chamomile, Poblano pepper, Serrano Pepper, Zavory Habanero pepper, Chives, Cilantro, Persian and english hothouse cucumber, Dill, Edamame, Fennel, Ginger, Little Gem Lettuce, Butter King lettuce, Dandelion, Walla Walla onion, white onion, Red Burgundy onion, Chervil, Hamburg rooted parsley, Anaheim pepper, Shishito pepper, Potatoes (fingerling maybe), Kabocha pumpkin, summer squash, rosemary, sorrel, tansy, thyme, Tomatillo, Tomatoes: Black, Orange, Green, Yellow, Purple, Zinnia.
 I met my husband, deployed to Afghanistan, got married, had a little girl, moved a lot, and am pregnant with a second girl. I sold my motorcycle, got out of the Navy and had to stop running (wah!- pregnant hips, hope that gets better) but got into lifting and Russian Kettlebells. Since getting out of the military we decided to settle in Nebraska and we are now homeowners. Phew! Lots of change!
 Career wise, I was a doctor in the Navy and continue to practice Emergency Medicine which is so much fun and challenges me every day. I picked up new hobbies… quite a number if I really think about it.


